Uncategorized

What is Neurosomatic Therapy?

You know that quote from Morpheus in the Matrix?

“Unfortunately, no one can be told what The Matrix isYou‘ll have to see it for yourself.”

That’s kinda how I feel about neurosomatic therapy. I mean, at its base, it’s a form of massage therapy. But I feel as if I have to layer on all these caveats and qualifiers, after I drop those words, “It’s a form of massage therapy,” so that people have a more realistic expectation of what treatment entails.

How about I just get started instead of wasting both of our time talking about talking about it!!

NST is a form of very targeted bodywork that is focused on bringing balance back to the body and the nervous system. Each session begins with a postural assessment during which we measure the position of many of your bones, including the bones of your head, in a few different positions (standing, seated, laying down).

We use these measurements to identify areas where the body is tilting, twisting, flexing, or extending. These measurements, along with your history and symptoms give us a good indication of what muscles, organs, or bodily systems need attention.

We’ll review the results of this assessment with you, help you understand what we think could be contributing to your pain, answer any questions, and then dive into treatment.

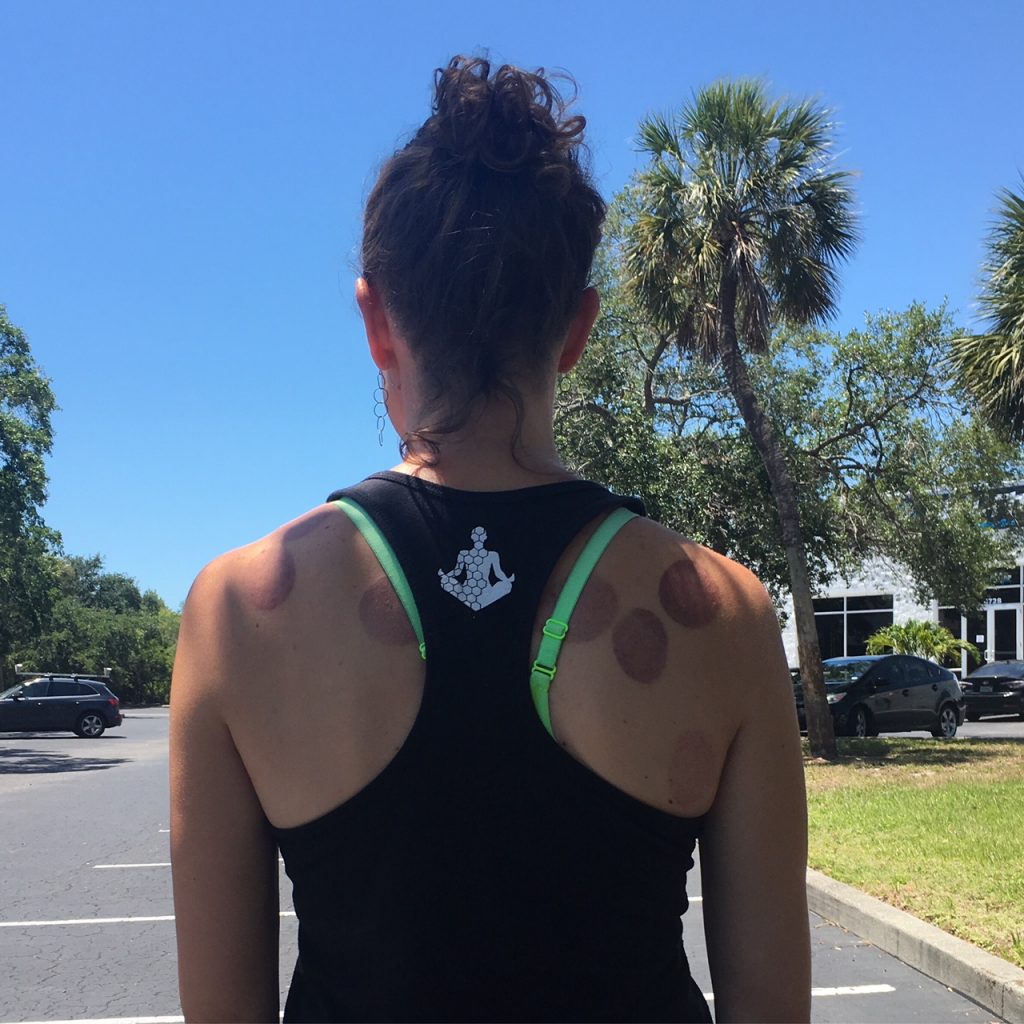
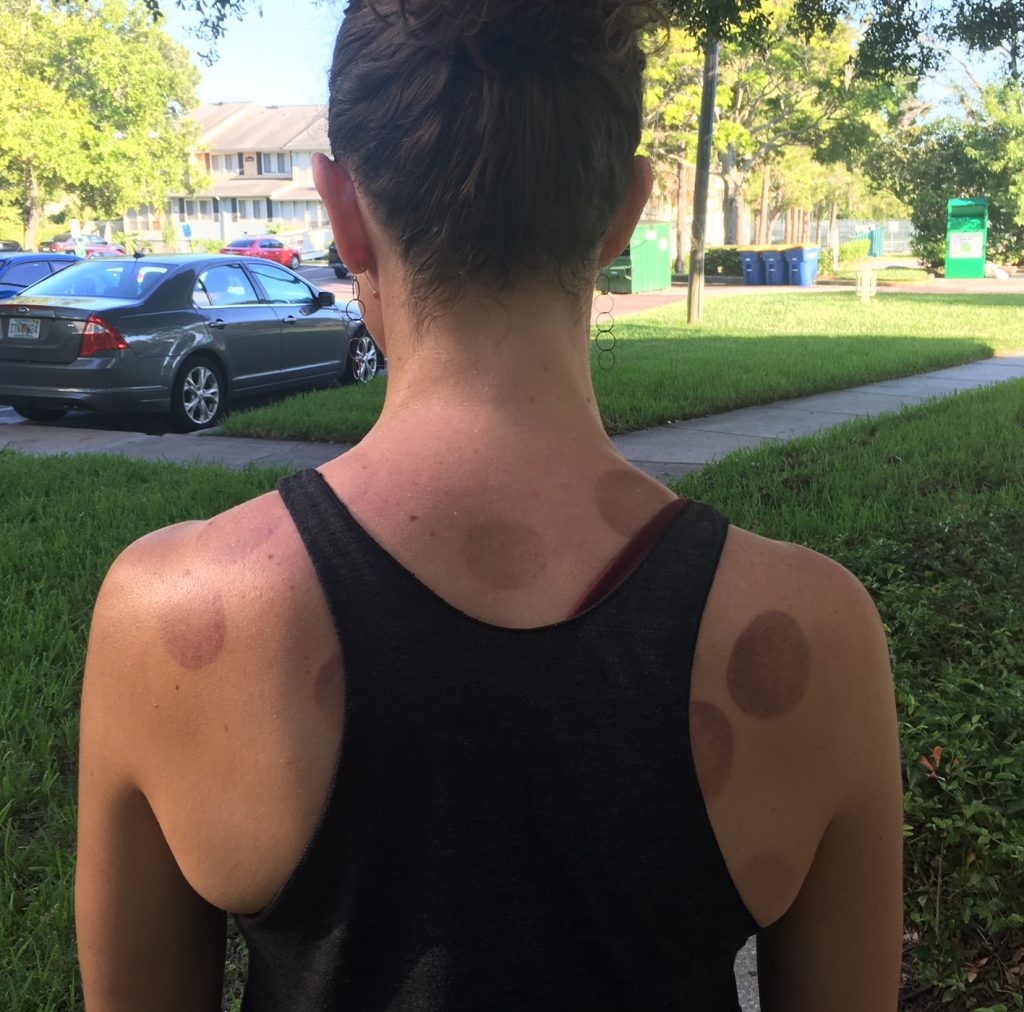
Treatment usually consists of very focused manual therapy (we might just work your right anterior deltoid, for example, instead of working your entire shoulder or both shoulders). We not only treat the usual suspects (upper traps, posterior neck, etc.), but we also treat muscles commonly overlooked such as the muscles on the face and head, the front of the neck, and inside the mouth, eye muscles, muscles of the hand and foot, etc. Treatment may also include joint mobilizations, breathing exercises, and treatment of your organs (heart, lungs, liver, intestines, bladder, etc.),

The work can be intense for some, as we search out specific areas (trigger points) that are not getting good blood flow. While the treatment may at times be uncomfortable, it should never be painful to the point where you are bracing against the pressure.

What can NST help with?

Headaches, migraines, tinnitus, vertigo, TMJ disorders, sinus issues, neck pain, whiplash, frozen shoulder, thoracic outlet syndrome, tennis/golfers elbow, carpal tunnel syndrome, back pain, scoliosis, low back pain, digestive issues such as IBS, painful periods, hip pain, sciatica, shin splints, foot pain, plantar fasciitis, etc.

Can NST fix me?

With NST we help you and your brain bring awareness to areas of the body that are misused, abused, or confused. This improved awareness, enhanced by expert targeted manual therapy and consciously done exercises, can help decrease pain and improve your performance. Ultimately, it’s YOU that heals YOU, by using this new-found awareness of postural patterns and habits to change how you move and interact with the world.

How long does it take to get better?

Some clients see marked improvement in their first session; however, many clients feel much better after the 4th session. Some clients see tremendous improvement after 10 sessions or so. It really depends on the severity and length of your symptoms, as well as other factors that influence your perception of pain (e.g. sleep, your thoughts about the pain, nutrition, movement, etc.)

What should I expect in a session?

During the session you could be up and down off the massage table, and you may be moving into a variety of positions (prone, supine, side-lying etc.) for treatment. To facilitate how active and varied the session can be, you will be dressed in either gym shorts (if you are a male) or a NST gown (shorts and a shirt that opens in the back) if you are a female.

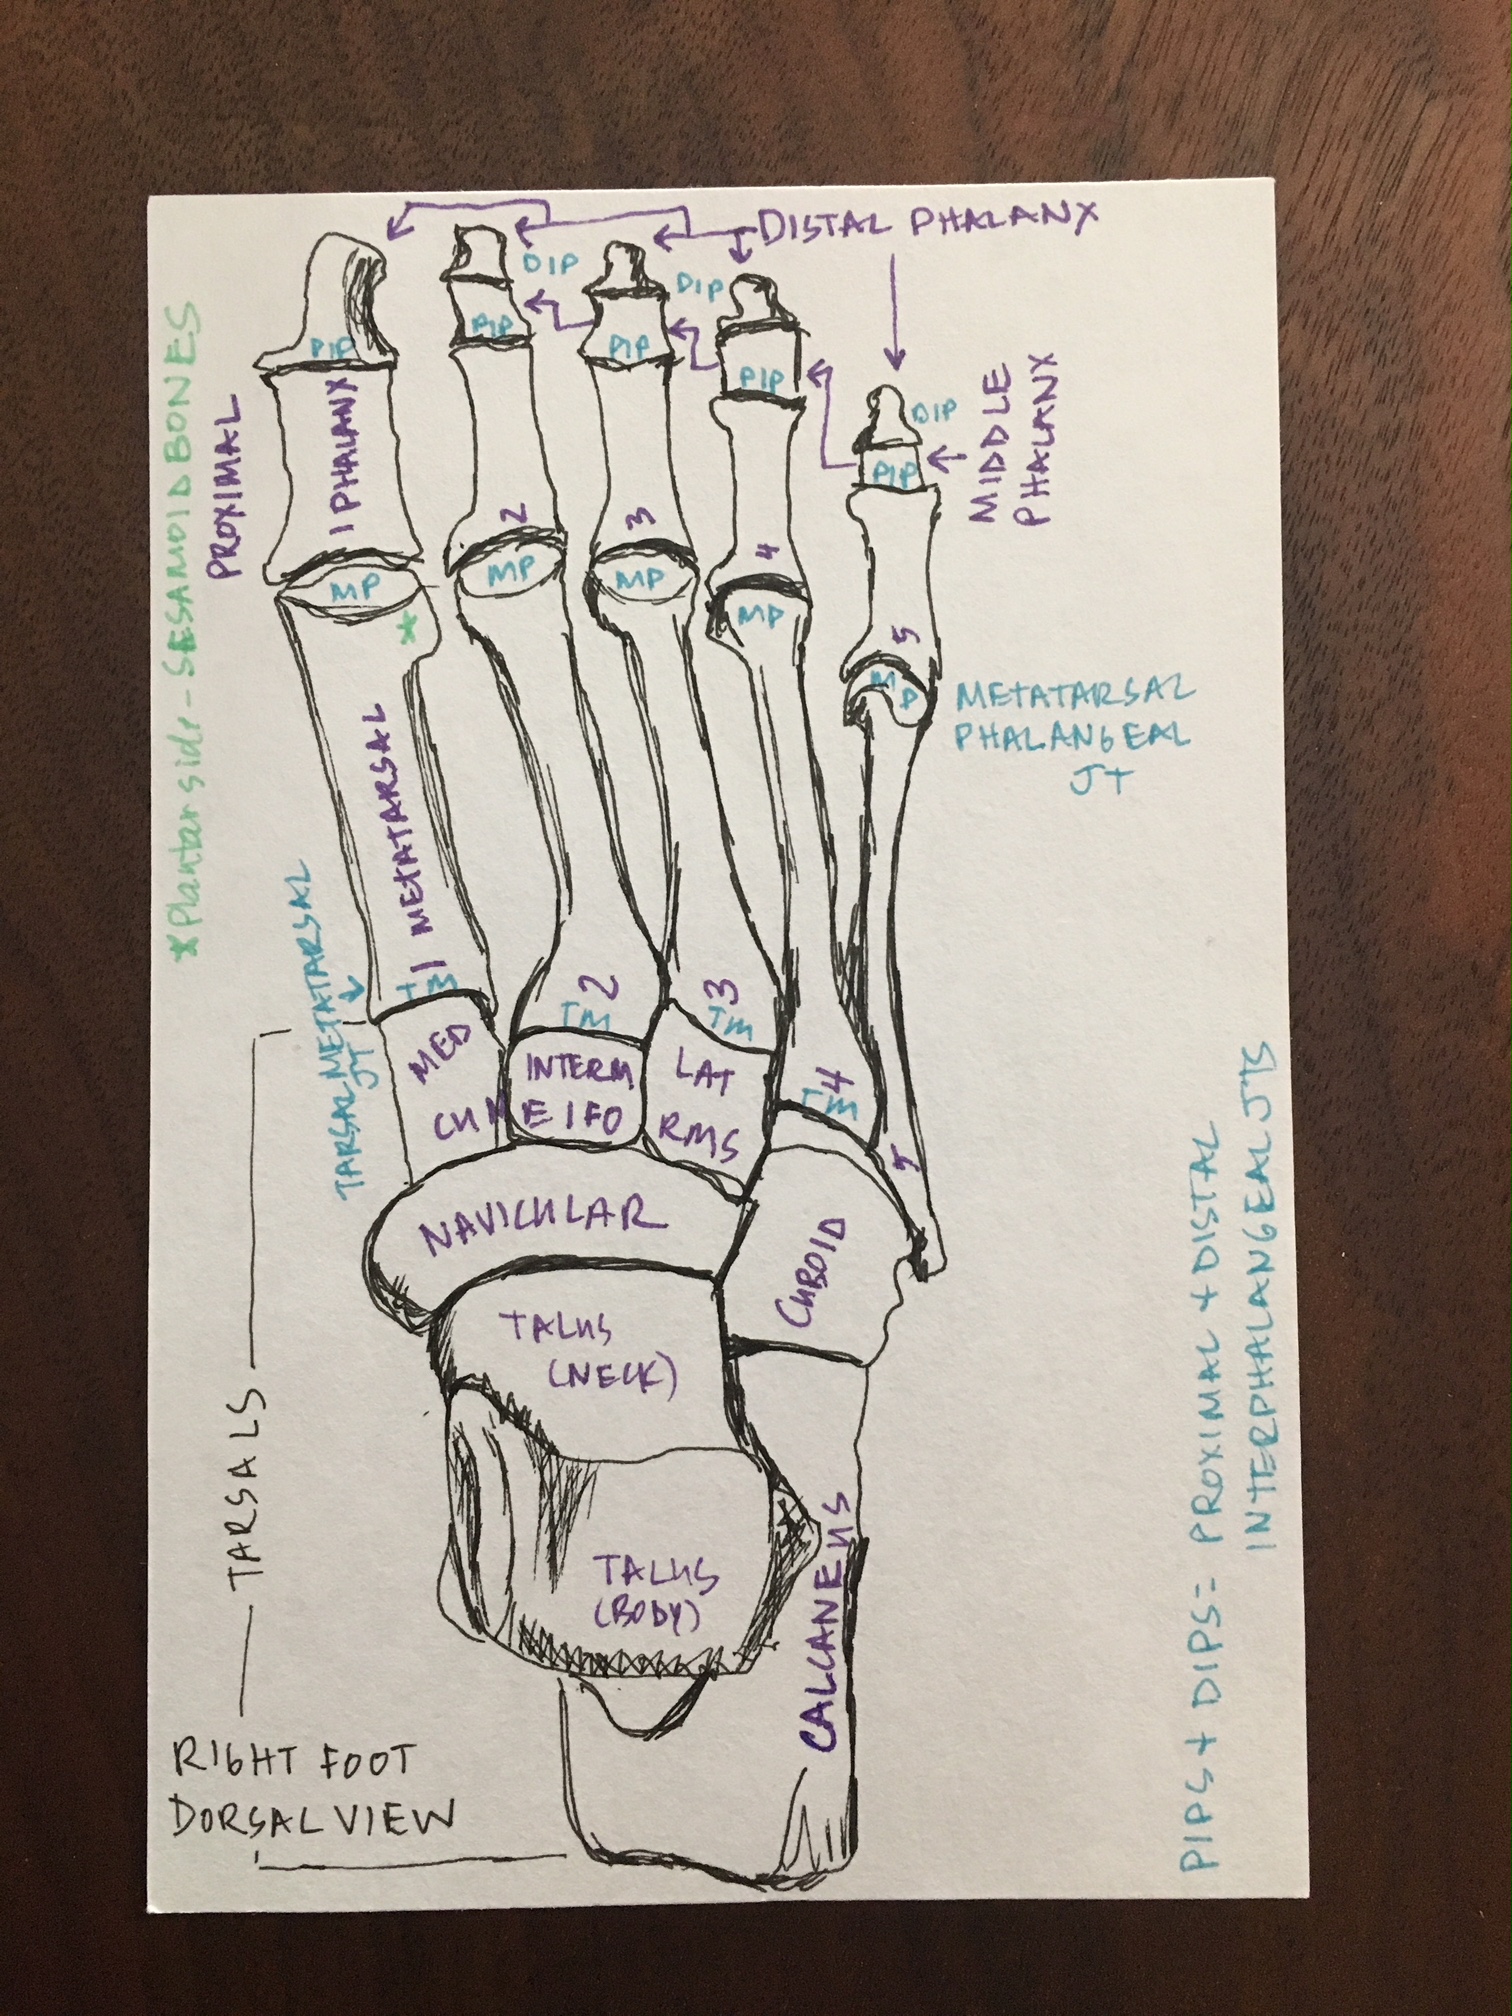
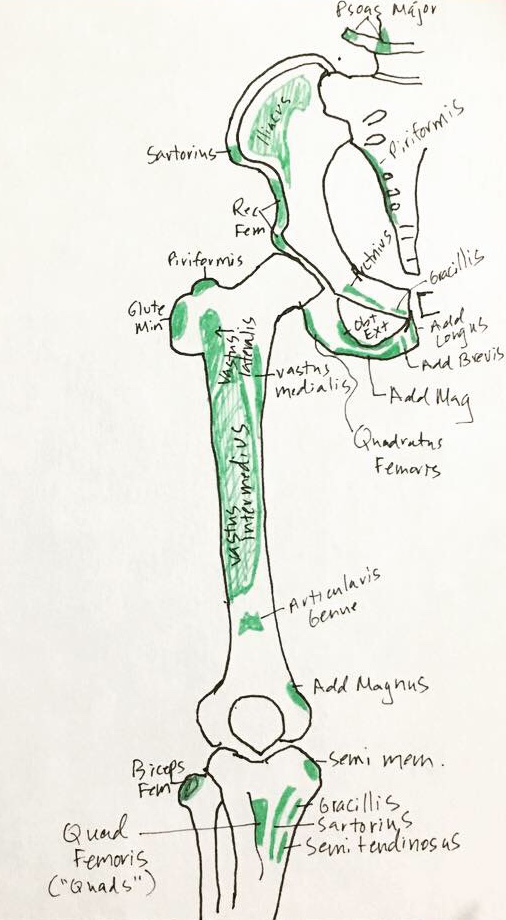
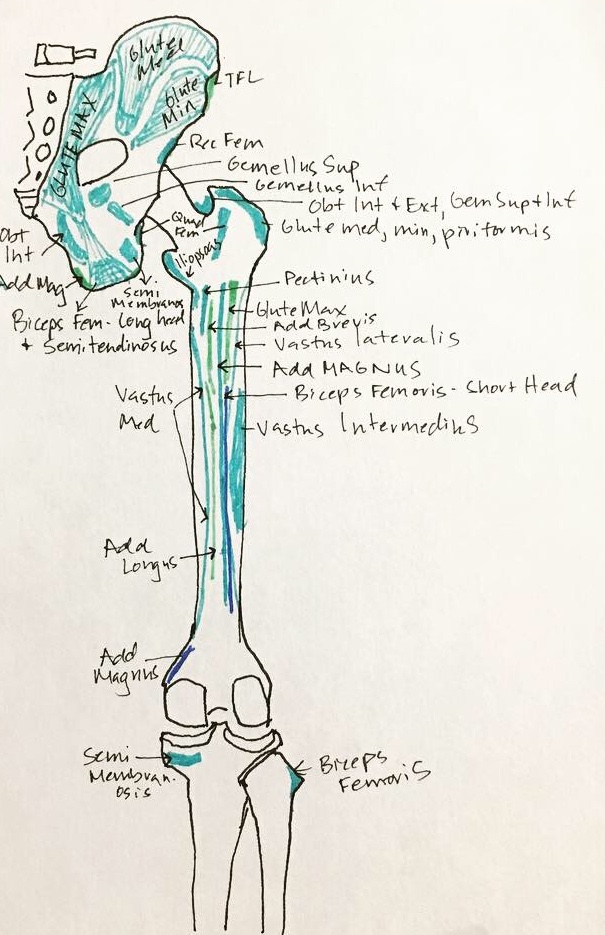
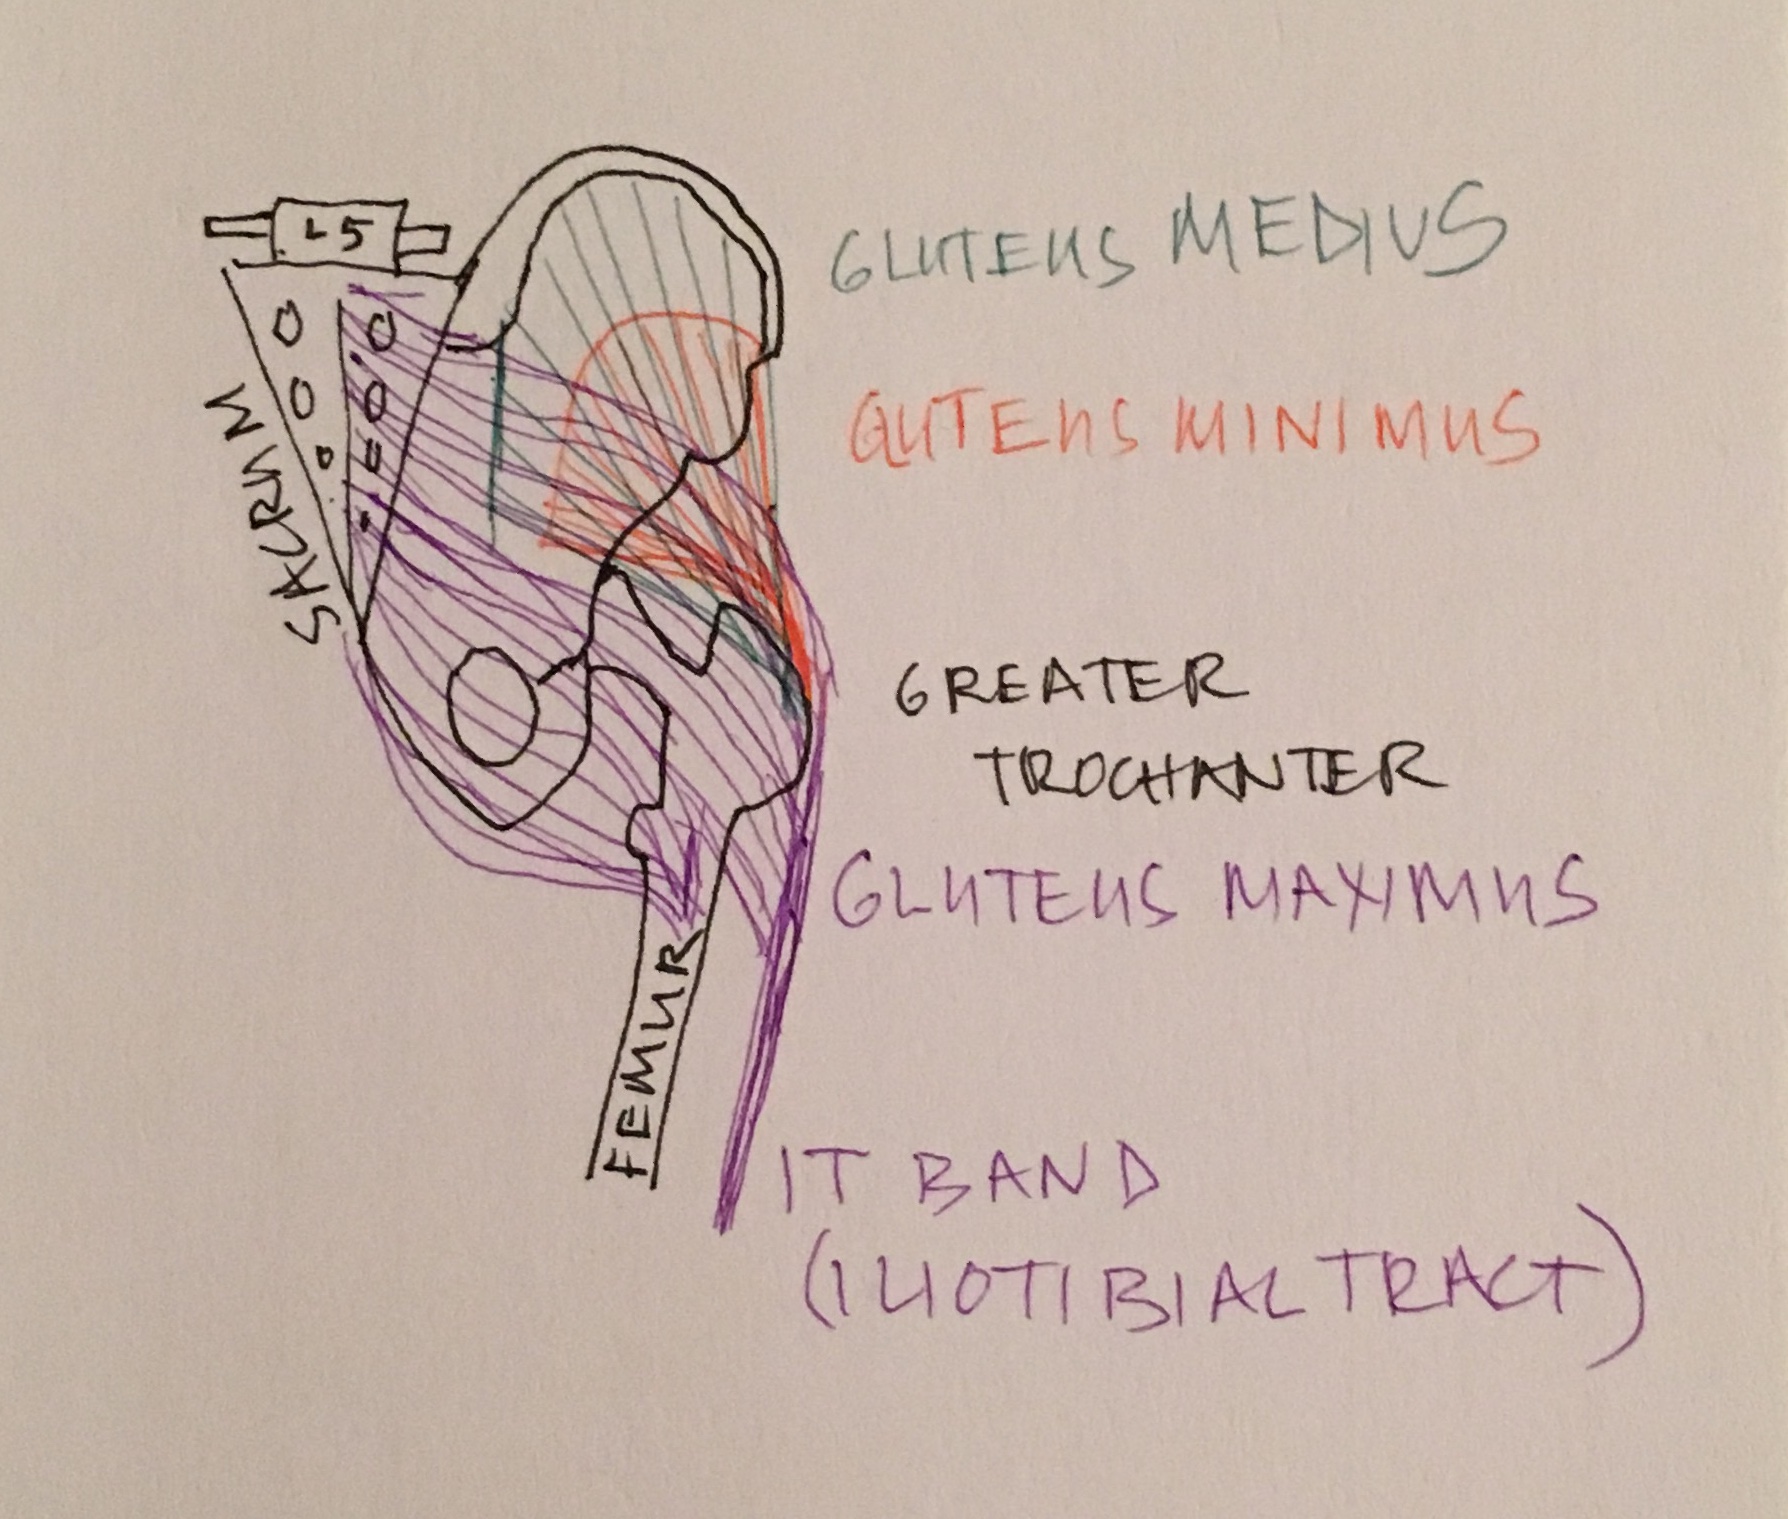
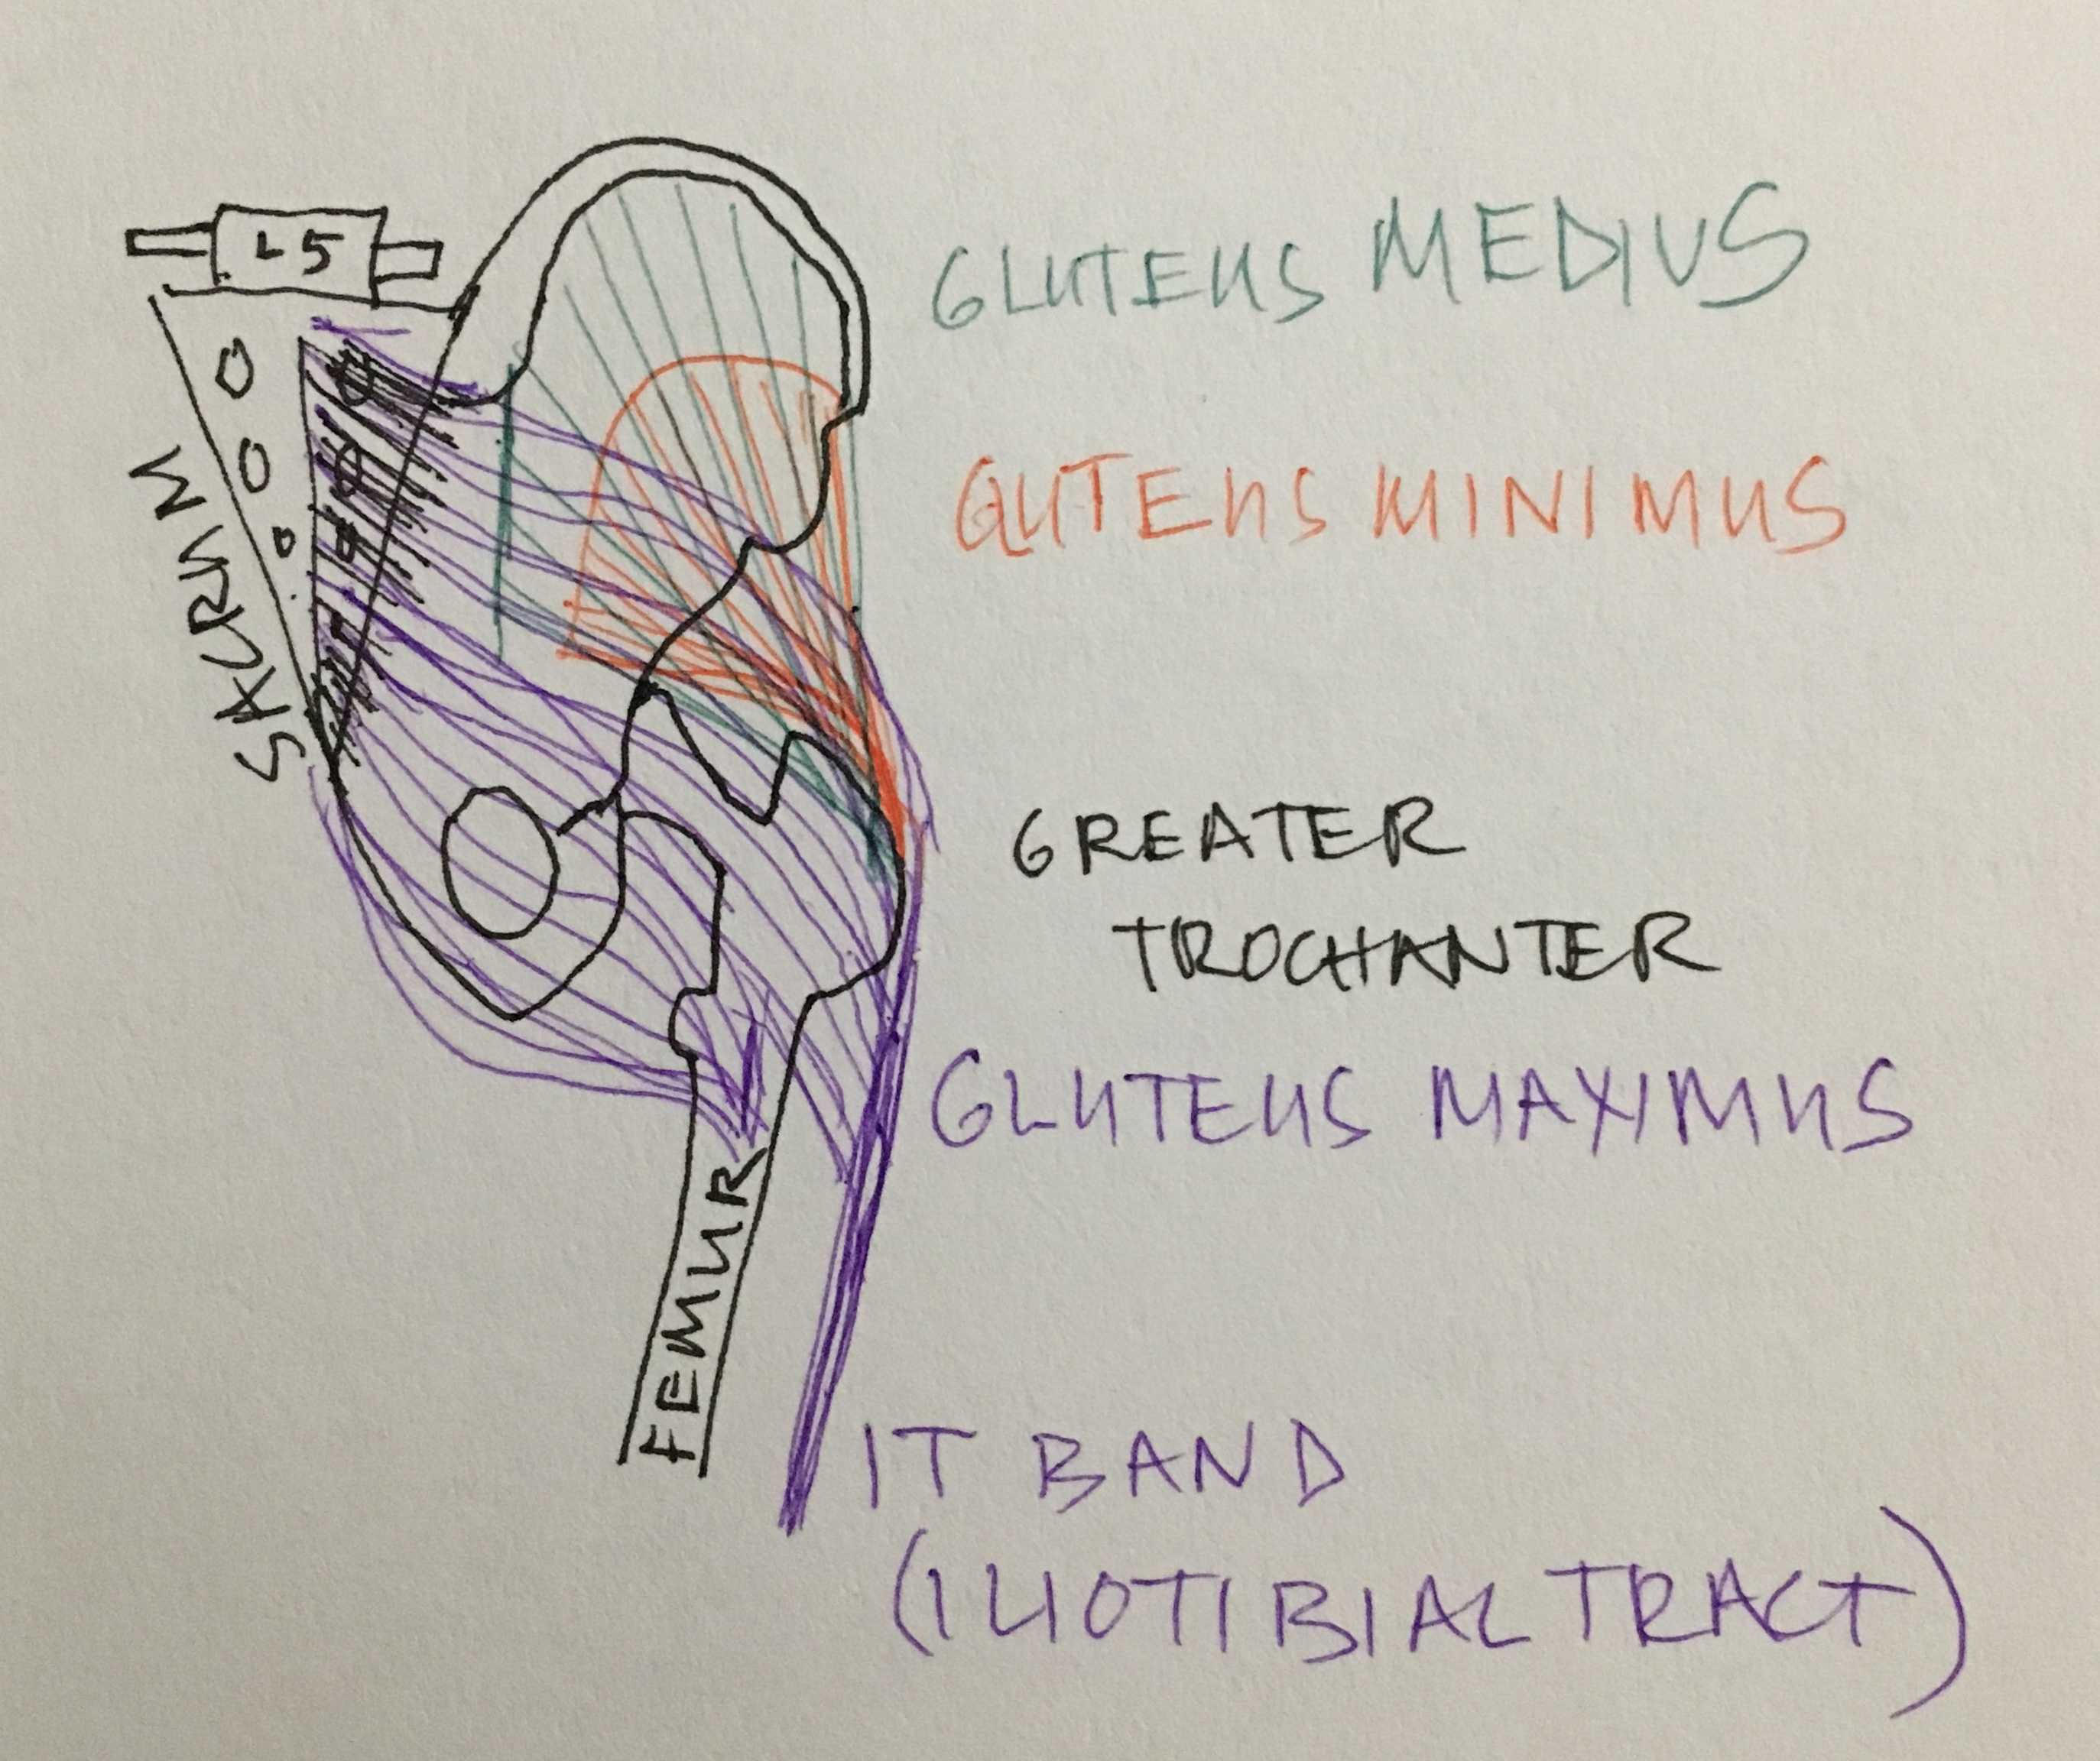
Each session will begin with the postural assessment and interview. Then treatment will commence. Treatment will include education, using models or anatomy software, to help you understand what is going on in your body. You may also do some exercises, and you will likely get homework. Lasting change can only occur by repeatedly showing the brain how to access the “new normal.”

Here is a video that shows a typical NST session.

What if I have more questions?

Leave me a comment below, or contact me using the link above or on Facebook at https://www.facebook.com/hloyoga/.

Health & Fitness, Massage Therapy

I learned something new – Rock Pods!

Well, I’ve been practicing neurosomatic therapy for about 3 months now. I’ve learned a lot. And I have A LOT to still learn! One thing I’ve noticed is how important it is to be mindful of my body while treating patients. I’ve been using my thumbs too much, which is a habit I need to break ASAP.

So, in an effort to get some relief for my poor pollicis, I took a Rock Pods course yesterday! Rock Pods are a silicon cupping option offered by the company Rock Tape. On Instagram I saw a Rock Tape instructor demoing how to use the pods to mobilize a scar, and it immediately caught my interest. How handy to be able to essentially attach handles to the skin and pick it up and move it!!

The class was great – for the price of tuition I got 6 hours of education, a Rock Pod set, and a RockBand Flex (a stretching band). The pods are super easy to apply and have a variety of benefits and uses:

  1. They create space between the layers of the skin, superficial fascia, deep fascia, and muscle, allowing more room for fluid to move through the layers (creating more slide and glide between the layers).
  2. They decrease “corticol smudging” which means that they improve the sensory map in the brain, which decreases pain and improves motor control. Basically, using the pods helps the brain understand what is happening in the body more clearly, which can down-regulate pain.
  3. The feeling of touch (which can be provided by the pods) promotes the release of nerve growth factor, again improving proprioception and motor control.
  4. This one I need to study more – the pods encourage the body to release heme oxygenate, which is an enzyme that breaks down heme (described as “blood garbage” by our instructor). When heme is not broken down, it leads to oxidative stress and inflammation, tissue injury, fibrosis, and excessive scar formation. When the heme oxygenase breaks down the heme, it release carbon monoxide (among other things), which modulates pain in the spinal cord.
  5. Cupping can also stimulate the immune response and decrease inflammation.
  6. The cups can also be used as a visual and tactile (aka haptic) tool to cue movement.

I am excited to start using this option with patients! I’ll just need to remember to forewarn them about the visual effects of the pods (and prepare them for lots of questions from curious strangers). 🙂 As you can see below, the marks are VERY noticeable, at least on me.

This first picture was taken right after class:

This picture was taken today:

Hit me up if you want to play/experiment with these fun tools!

Hope you have a fabulous Sunday!!

Health & Fitness, Massage Therapy, Meditation, Yoga

Hlo Heaven

Today’s post will be brief, as I’ve been procrastinating (watching Great British Baking Show, cooking food, looking at Facebook, you know 🙂 ), and I still have lots of studying to do, and Tim and I are supposed to play Jaipur too!

ANYWAY,  I wanted to let you know about an exciting development.  We are bringing The Roll Model® Method Teacher Trainings to the Center for Neurosomatic Studies! I cannot convey how excited I am about this.  The whole reason I found out about neurosomatic therapy is because a Yoga Tune Up® teacher took her son to an NST therapist and was blown away by the treatment. She commented on it  on the YTU Teachers Facebook page. I was in the middle of trying to figure out what I wanted to do with my life (I wanted to help people in the health/wellness arena, but did not want to go back to school for 6 more years and spend $100,000 on tuition). Her post sparked my interest, and upon Googling, I found  my school.  And here we are, about 2 years later, and I am on the cusp of graduating from CNS!

Anyway, back to my original point, in school we are taught how invaluable it is to give patients “homework.” It’s vital to help remodel their bodies, and it also helps them realize they have an internal locus of control. Their therapist/doctor is not responsible for their health, the patient himself/herself is!  The self-massage that is taught in Yoga Tune Up® is a perfect compliment to the work we do in NST.  This has become abundantly clear to me as I’ve progressed through the program, so much so, that I thought, “We HAVE to bring a YTU training to this school!”

I talked to my teacher, mentor, and school-owner, Randy, and he readily agreed.  And my dream is coming to fruition!  In March, we will offer both of The Roll Model® Method Trainings at CNS!  One of my teachers from my Yoga Tune Up ® Level 1 training is going to teach the class.  She  made a huge impact on me during the Level 1. I remember telling her, “I’m just a part-time yoga teacher. I just do this on the side…”  And she called me out on minimizing myself and my skills, and it solidly hit home!  The fact that this super-talented, intelligent, gifted woman thought I had something real to offer to people gave me a whole new perspective on what was possible!  And she is the person who will be teaching this class.  🙂

Here are the links to the classes:

The Roll Model® Method – The Science of Rolling

The Roll Model® Method – Ball Sequencing & Innovation

If you are at all interested in learning some easy-to-use self-massage techniques for yourself or your clients/patients, I cannot recommend this training highly enough. I would so love to see you there!

Hope you are having a great Sunday!


Health & Fitness, Massage Therapy, Meditation, Yoga

The Fabulous, Fantastic, Fearless Foot

I now know ALL the muscles in the body.  Ha! I wish.  I mean, I think I’ve probably learned about all the muscles in the body, but I don’t remember them all.  Yet.  We just finished up learning about the lower body, all the way down to the feet.  I had no idea that feet are so complicated!!  As we learned in class, the complex nature of the feet makes them capable of amazing feets/feats (get it!!), but it also makes them prone to a variety of issues.  How many people do you know that have bunions or plantar fasciitis or heel spurs or hammer toes?  A lot of these issues are caused by misuse/abuse of the feet.  I’m going to try to provide a very high level overview of the feet and then show you what you can do to bring relief and increased awareness to the feet.  And before I forget to mention it, if you have any of these issues, neurosomatic therapy can help!!  I graduate in February, so come see me!!

Ok.  First of all.  Let’s look at the boney structure of the foot.  You have the big heel bone (aka calcaneus), on top of which sits the talus, which fits into an arch (aka mortise) made by your shin bone (aka tibia) and fibula (the bone that’s on the outside of your lower leg).  This forms the joint of the ankle.  Next you have an assortment of oddly shaped bones that fit together like puzzle pieces – the navicular, cuboid, and cuneiforms.  Next you have the long skinny bones of your foot, the metatarsals, which connect to your toes, which are made up of phalanges.  Here is a picture to give you an overview:

These bones are held together by tons of ligaments (very strong connective tissue), and connecting with these bones are all the muscles of your lower leg and foot.  These ligaments and muscles maintain the two arches of your foot. Yes! There are two arches down there!  There is the longitudinal arch, which forms your instep.  And then there is the transverse arch, which goes horizontally across your foot.  These two arches work together to absorb force from the ground and transmit it up the body.

Man, I’m just getting started.  I really wanted to discuss the the muscles IN the foot too.  Did you know there are TWELVE of them (depending on how you count them) and FOUR separate layers of muscles?  Just bonkers. But we’ll have to discuss the bonkeriness in another post because this one is already getting too long.

Let’s get to the really fun stuff. What can you do if you have foot pain?  One easy thing to do is to get a small, soft ball (I recommend a Yoga Tune Up® ball, due to its squishy, pliable nature) and step on it.  Yep.  Just stepping on the ball will increase your awareness of your feet and start to dissolve tension between all those tiny joints.  Here is a video that will guide you through an eye-opening foot roll.

You can also increase awareness of your feet (and help bring energy down from that monkey mind into your feet, which is very grounding) by meditating on your feet.  Here is a 10 minute meditation that will guide you through that.

Hopefully you have a better understanding of your amazing feet now!  I hope you find some time to give your feet some love today.  Let me know what you think of the video and or meditation.

Have a great Sunday!


Health & Fitness, Massage Therapy

Study Tips for Going Back to School as a 40-Something Adult

A friend of mine recently asked what apps I use for school and how I keep myself organized.  As I typed up a massive text to her, I was realized this kind of info is better relayed via blog post where I can be my typical wordy self. 🙂

A little bit of background on where I am coming from.  When I turned 40, I decided to move to Florida (with my long-suffering husband) and go to school for massage therapy.  But not just any massage therapy – I chose to attend a neurosomatic therapy training program that consists of an intense 18-month course where you learn about all the organs, muscles, and systems of the body and how to treat  all of them.

My BA in Accounting and MBA did not quite prepare me for this program.  Also, being out of school for years and years also did not adequately prepare me for this program.  Also, being 40-years-old and accustomed to nice things like organic food, eating out, and cars that do not break down every week meant that I wanted to continue working while going to school, which meant I would not have a ton of time to study.  So I was on the struggle bus when I first started!

Here is how I managed to make it through 3/5 of the program whilst working 26 hours/week: organization and apps!

  1. Pomodoro Blocks.  I was introduced to this concept while listening to this book.  The pomodoro technique involves working for 25 minutes (completely focused) and then taking a short 3-5 minute break.  After completing 2 or 3 pomodoro blocks and breaks, you take a longer break of 30 minutes.  This approach was invaluable to me. I would tell myself, “Heather, just 25 minutes.  Just do 25 minutes of studying.  Then you can look at Facebook or Instagram or eat some chocolate and almond butter.  Just get in your 25 minutes.”  And I did!  Breaking up work into small chunks like this made it more manageable and helped reduce my severe procrastinative tendencies.
  2. An adjunct to the pomodoro block is my Brainwave binaural rhythms app.  This is an app that shoots frequencies into your ears (via headphones) to sync your brainwaves to a specific goal.  I would set the app to Memory Boost, set the timer to 25 minutes, and start studying.
  3. Essential Anatomy.  This app is so helpful for getting a 3 dimensional view of muscles and understanding the layers of muscles.
  4. Voice Record Pro.  For my first 1.5 semesters I used Voice Memos to record the anatomy lectures.  Then one of my fellow students told me about this program, and it CHANGED MY LIFE.  Ok, maybe a little dramatic there.  But this really is an awesome app for recording lectures.  You can easily skip forward or back 10 seconds, you can speed up playback, you can set bookmarks.  HUGELY useful!!  We learn in school that you need to hear something 7 times to remember it.  So hearing the info in class, writing up flashcards on the material, and then listening to the lectures again (while walking outside each morning), means I’m about 1/2 way there.
  5. Flashcards brings me to the next point:  Quizlet.  I personally prefer to use paper flashcards, because I learn better when I write and draw out things versus typing them.  But for people who like electronic flashcards, I’ve heard great things about Quizlet.
  6. Bullet Journal.  I have experimented with a few other planners – the Passion Planner, Panda Planner, etc.  But I couldn’t find one that had the flexibility I wanted.  So I created a Bullet Journal.  This is my second iteration of it, and I really like how it works.  I set up one page with the whole month listed on it, and then each day gets 1/2 a page.  I separate each day into two vertical columns. The larger column on the left is where I put the list of things I want to get done.  Completed items get a line through them, and items that need to be moved to the next day get a <.  In the right-hand column, I put my major goals for the day (e.g. meditation, study, reminders to slow down, etc.). I also recently started a section where I track the “language of the world” as I understand it from The Alchemist.  These are numbers, creatures, synchronicities I see in the world that make me feel as if I am on the right path.  This structure gives me flexibility,  and all the blank pages in the back give me lots of room to track the other random stuff I need t0:  meanings of numbers, ideas for workshops, goals, reminders on how to build confidence, trainings I want to take, things I want to draw, etc.  It’s a good brain dump location.  Here are some pics:

I have about 2.5 months left of school, so hopefully these tools see me successfully through to the end.  Let me know if you have any helpful study tips! Do you use a Bullet Journal?  If so, what helpful hints do you have?  What study/memory tricks work well for you?

Thanks for reading, and chat with ya’ next week!!


Health & Fitness, Massage Therapy, Uncategorized, Yoga

Adding Adductors to your Body Body of Knowledge

Yes.  I purposefully tried to make the title of this blog as confusing as possible.  Why?  Does it mean I’m not a good writer?  Does it mean I don’t care about the edification of my readers?  Does it mean my brain finds pleasure in confusing word play that takes a couple of moments to figure out?  Because, No, No, and Yes. 🙂

So, Adductors.  If you are like me, you probably have only ever heard of adductors as a glump of muscles that get “stretched” in wide-legged yoga poses like prasarita padattonasana (wide-legged forward fold). Before starting school at the Center for Neurosomatic Studies (CNS), I had only a vague notion of some muscles in my inner thigh that were super tight, and which did not allow me to do wide-legged poses without getting a cramp in my butt.  Thank you, CNS, for helping me understand with specificity what these muscles are.

Your adductors are made up of several different muscles that connect from the lower portion of your pelvis to the back side of the long bone of your thigh (the femur).  I realize the pelvis can be a bit of mystery as well, so here is brief overview of the points we need to know about.  The pubis is the bone on the front of your pelvis.  If you are like me, you often accidentally ram this into countertops/tables, and it hurts like a mother.

Directly underneath the pubis is the ischium.  Sit on your hands.  Go ahead – it’s okay.  Sit on your hands.  You feel those bones pressing into your hands?  Those are your ischiums (commonly called “sit bones”).  The pubis and the ischium are the superior (aka “upper” or “northern”) attachment points for the adductors, as you can see in the drawing below (which is a view of the pelvis from the front).  Disclaimer:  these are drawings I did quickly for my own personal study aids, so they are not 100% accurate.  They’ll give you a gist of the anatomy, however. You can click on the pictures to make them bigger.

The adductors are made up of the Pectineus, Adductor Longus, Gracilis, Adductor Brevis, and Adductor Magnus muscles.  You can see the specific attachment points in the illustration below. (Please note that my anatomy text led me astray in regards to the attachments of Gracilis and Adductor Longus.  They should actually be flipped).


From the pelvis, the adductors travel at an angle to connect to the back of the femur, as you can see in the illustration below.  I used to think that the back of the thigh was made up of just the hamstrings.  But there is a lot going on back there! All the adductors connect there, as well as many of the quadriceps.


Why are the adductors important?  For SO many reasons!  They have trigger points that can present as pain in the front and inside of the thigh and in the genitals and rectum.  They can cause the sacrum to tilt, which forms an uneven base for the spine, resulting in a functional scoliosis.  Also, the adductor magnus can pinch the greater saphenous nerve, causing the knee to collapse while walking.

At CNS we learn how to treat the adductors, which can relieve the symptoms described above.  But sometimes releasing a muscle is not what it needs. Sometimes it needs to be stronger.  Weak muscles can contribute to pain, just like over-active muscles can.  I love the Adductor Slides Yoga Tune Up® pose; it helps you tune in to your adductors and strengthen them in a fun and slightly excruciating way.  Here is a demo from Trina Altman.

Well, I hope you learned a little something about your body today. If you try the adductors slides, let me know what you think.

Thanks for reading today!


Health & Fitness, Massage Therapy, Meditation

Butt Stuff

Yep.  Are you like Troy Barnes?  Do you love Butt Stuff?   Well then you’re in luck!  We covered Butt Stuff this week.  And by “Butt Stuff” I mean all that meat that covers your backside.  Did you know that there are actually 3 different gluteal muscles that make up “the glutes”?  Yes! It’s true.

The gluteus maximus is the big boy, as the name implies.  It runs from the lateral edge of your sacrum all the way out to your femur (the long bone in the top of your leg).  The top part of the muscle merges into the IT band on the outside of the leg, and the lower portion attaches to the back of your femur.  But underneath that are two more glute muscles!  The gluteus medius lies underneath the maximus, and underneath THAT lies yet another muscle – the gluteus minimus.  Please see my quick sketch below to get an idea of how these muscles lie in relation to each other.  And yes, I forgot the “l” in gluteus minimus and had to go back in and squeeze it in later. Thank you, Tim, for the .388mm pens. 🙂

Underneath all of these layers are the deep rotators of the hip, but I’ll have to save those for another blog post, or this will get too massively long, and I have a test to study for!  And a bike ride and brunch to do!

So, your glutes.  Why are they important?  Well, glute max is the largest muscle in the body and can be up to 2 to 3 inches thick! Consequently, it can have a huge impact on postural distortions.  The glute group can cause pelvic extension (a “tucked” tail), pelvic projection (where the hips are thrust forward of the feet and knees), a pelvic tilt (where one side of the pelvis is higher than the other), external rotation of the femur (“duck feet”), and low back pain.  These muscles can also mimic sciatic pain – sending trigger point referrals into the buttocks and down the back and side of the leg.

Issues with the glutes are quite common, considering we are supposed to use them to MOVE all day long, but we generally just use them to SIT all day long instead. As a result, many people have difficulties activating their “sleepy” glutes.  This became really evident to me when I took a Yoga Tune Up® workshop where we went through the following guided practice:

  1. Lay on the floor, legs straight out (aka savasana).
  2. Try to squeeze your right butt check.  Try the left. Do you know notice any difference in power/contraction?  How far did your hips lift off the floor with each squeeze?
  3. Take a massage therapy ball (a Yoga Tune Up ball, a tennis ball, etc.) and place it under the thickest part of just the right butt cheek.
  4. Contract the right butt cheek for 20 seconds, as you release the contraction, the ball will sink deeper into the glutes.  Repeat 2-3 times, sinking deeper each time.
  5. You can rock your body slowly side to side over the ball.
  6. Without sitting up, reach under your glute and remove the ball.
  7. Let your awareness settle back into the glutes.  Does the right side feel any different than the left?  Any changes in temperature?  sensation?
  8. Contract the right butt cheek. Then the left.
  9. Do you notice any difference in power/activation/sensation in the right side?

If you were like me, you were like, “OMG.  My right side has so much more power now!!!”  You just woke up your butt!!

The YTU balls are great for increasing proprioception and awareness of these muscles, and with regular use, you can keep these muscles active and reduce the chronic tension that is held there.  At the Center for Neurosomatic Studies, we are trained to treat this group of muscles VERY specifically.  In addition to treating the muscle belly (which is what you contact with the balls), we get into the attachments and different layers of tissue, and we can even get into that trough on the medial aspect of the greater trochanter.  The combination of self-massage and bodywork is super helpful for this powerhouse.

Let me know if you have any questions or comments.  If you try the exercise described above, let me know how it feels for you.  I personally store a lot of tension in my glutes, so when I get them treated or I roll them out, I feel super relaxed and down-regulated afterwards.  Good luck waking up your butt!


Health & Fitness, Massage Therapy, Meditation, Yoga

The Delightful, Dynamic, totally Dope Diaphragm

In last week’s post, I mentioned that the psoas shares attachments to the diaphragm, so I figured we might as well delve into the diaphragm next.  Please note my extensive use of alliteration within this post, as alliteration is amazingly awesome.

I should start by saying, in this post I will be discussing the RESPIRATORY diaphragm, as there are a few different diaphragms in the body.  The respiratory diaphragm, as the name implies, is related to respiration (aka breathing). It is your primary breathing muscle. Or at  least it should be.  For a variety of reasons we can end up constantly using accessory muscles like the neck and shoulder muscles for breathing. This can lead to chronic neck/shoulder tension, head-forward posture, and an amped up nervous system.  But I digress.  Man, this topic is hard to write about without octopusing off into a tangent!!

The diaphragm is a large, domed-shaped muscle that sits inside your ribcage – think of a parachute tucked up under your ribcage.  This muscle separates your heart/lungs from the rest of viscera (liver, stomach, intestines, etc.).  It forms a seal around your ribcage that enables the pressure changes that inflate and deflate the lungs with each breath.  At rest (meaning the muscle is not contracted), the diaphragm is in parachute mode – domed up inside the chest.  When you inhale, it actually flattens and moves DOWN, pulling air into the lungs, and pushing down on the viscera below.  If you want to understand this concept better, you can watch this video (and learn how to make a working lung/diaphragm model yourself!).

We take about 23,000 breaths a day.  With each breath, the diaphragm (which shares connections to the pericardium which contains the heart), massages the heart above it and the organs below it, keeping everything nice and mobile and moving stuff like blood and lymph through the body.  So you can see why I say the diaphragm is delightful, dynamic, and dope!  Such a helpful muscle!

But like any muscle, it can become dysfunctional due to misuse, disuse, overuse, and abuse (to borrow some language from Jill Miller). When this happens, your posture can be affected, breathing issues can arise (asthma, COPD), and your sympathetic nervous system (flight/flight/freeze) can become ramped up, causing anxiety and panic attacks.

But there is good news!!  Even though this muscle seems inaccessible, all tucked up under the bony cage of our ribs, it can actually be treated with manual therapy.  At the Center for Neurosomatic therapy, we learn how to work with the patient’s breath to get our thumbs up under the rib cage and treat this muscle.  And, yes, that is as uncomfortable as it sounds.  BUT, it is SUPER effective.  Each time I’ve done this treatment, the patient notices IMMEDIATE improvements in his/her breath.

If you don’t have access to a neurosomatic therapist’s thumbs, you can do some self care on your own diaphragm.  As with anything, Awareness is Step #1:

Take a moment, close your eyes, and see if you can tell where you feel your breath happening in your body……………………………………..

Done?  Ok.  Where did you feel it?  Did you feel it up in your neck?  Your shoulders?  Did you feel your ribs expand?  Did you feel your belly move at all?

If you feel all your breath up in your shoulders and neck, try focusing on pulling that breath down lower in the body.  You can use the Yoga Tune Up® Coregeous ball to help.  Check out the video here from one my Instagram Idols – the Movement Maestro.

I hope this helped you understand the darling, dependable, damn-brilliancy of the respiratory diaphragm.  Give it some love today – we think we have it rough if we have to work 50 hours a week. It works 24 hours a day, 7 days a week!

Have a fabulous Sunday, and let me know in the comments if you have any questions!

Hlo Out!


Health & Fitness, Massage Therapy

Jamaica Trip – Final Post

This is the final post in a 4 part series about my mission trip to Jamaica.  With this post I pick up with a discussion of the observations/lessons learned from the trip.

  • Patient stories
    • One patient was suffering from hip and leg pain, going down into her feet. I treated her glutes and calves, but it didn’t seem to help her pain much.  Randy was occupied, so I figured I would just rub her feet, as that was her main complaint.  When she got up from the table, she felt much better and gave me a big hug.  Randy and I looked at her chart after she left, and he noted that she was diabetic. He said that rubbing her feet was probably the best thing I could have done for her.  It made me feel really good that my instincts were right!  This patient came back on Thursday and waited for over an hour for another treatment.  Unfortunately, she was still 7thon the list by the time she had to leave.  She lobbied hard to get moved up the list, but we were worried about a revolt, so instead of a treatment, I took a few minutes and showed her how to roll out her feet and lower back using a Yoga Tune Up ball.  She left happy and satisfied, with some solid self-care tools.
    • I had one patient with pain radiating down his leg. I treated his glutes, and the DO student working with me performed OMM on his piriformis, but our treatment did not help and actually seemed to exacerbate his issue. We deduced that his pain must originate higher up in the body – possibly a result of a herniated disc.  Randy took the patient back down to the DOs, who agreed that a disc could be a culprit. The DO was able to help with the pain and also provided a referral for an MRI.  It was a good lesson for me to see that while we can do A LOT to help patients with pain, somethings cannot be fixed with structural therapy.  It’s so important to be part of a medical team, so that patients can get the help they need.
    • I had one patient with pain around the sacrum and the xyphoid process.Randy had never encountered that combination of pain before, so he started running through the list of muscles that connect the hips to the chest.  Psoas!! I worked her psoas and almost immediately she felt a referral up to the exact area of her anterior chest pain.  That was a lesson to me that, if the book doesn’t have the answer, use your common sense!
    • I saw several people literally start DANCING when they got off other therapist’s treatment tables! There was a really amazing energy and joy permeating our beautiful open-air treatment space.

On Friday, we got to relax.  We took a boat trip along the coast, up Black River, and out to a bar built on stilts in the middle of the ocean. I got to see a real, live crocodile.  It was like seeing a living dinosaur.  It could have been the coolest thing I have ever seen. The wind was powerful that day, and it was having fun pulling up bits of the ocean and tossing it in my face while we were in the boat.  I was obliterated by the wind and sea, and I couldn’t be happier.

In a nutshell, this week showed me the importance of being present with the patient, listening to his or her full story and absorbing all the facts, and taking things slow – no need to rush.  I also learned you can’t learn how to do massage therapy by reading about it. You have to DO IT – that is where things start to make sense and you can start to tie the book learnin’ to a body.  It is one thing to be told that someone with a lower limb length inequality will have medial leg pain on the short leg and lateral leg pain on the long leg.  But when you SEE that on a patient, you remember and integrate it. It becomes part of your muscle memory.

I am so grateful that I had the opportunity to go on this trip. I spent the week in a paradise, surrounded by people I love, admire, and respect, eating amazing food, having real conversations, and learning my brains out.

It has forever changed me. <3


Health & Fitness, Massage Therapy, Meditation

Jamaica Trip – Part 3

Welcome to Part 3 of the Jamaica series!  With this post I continue the review of my observations/lessons learned from the trip.

  • I definitely experienced many highs and lows over the course of the week. After some treatments I was in the depths of despair, feeling 100% inadequate and overwhelmed.  And then the next patient would respond really well to the treatment and to me, and I was back on cloud 9.  It was a complete yo-yo of emotions, both exhausting and exhilarating.  On the bus back to the hotel each night, I would reflect on the day, on how hard it was, on how I didn’t feel as if I knew what I was doing, on how uncomfortable I was, being in a position of uncertainty and doubt. Net, even with all the discomfort, I was so much happier after a day working on and with my fellow humans than working in an office on a computer all day.
  • I need to study more! We learn so much so fast in this program.  I need to find a way to remember what we have been taught because in the thick of things, my brain really struggled to retrieve all those trigger points, muscle attachments, and protocols.  I could feel the solution to the puzzle just outside of my consciousness, but I could not quite grasp it.
  • If/when I do this again, I need to learn Patwa! While most of the patients spoke English, with the accent and with being slightly hard of hearing, I had SUCH a difficult time understanding exactly what was being said.  Thank goodness for gestures!!
  • I need alone time!! Seven days surrounded by 30+ people was a bit overwhelming.  I meditated almost every morning for 30 minutes, sitting within ear shot of the ocean.  I think that contributed so much to my sanity.
  • My preconceived notions about who we would be treating were completely misinformed. My first patient had been a stockbroker in NYC for several years!  Many of patients had lived in England for years and retired back home to Treasure Beach. One of my patients had actually been to Iowa State University to learn about agriculture!  These brilliant, sophisticated, kind people had moved back to their roots and were busy improving their community.  Very inspirational.
  • Hugs and blessings are a very fulfilling form of payment, especially when your food and housing needs are met.
  • I want to learn more OMM (osteopathic manipulative treatment) from the doctor of osteopathy students. From the glimpse I received, it really piqued my interest.  It seems as if they use longer holds (moving patients into areas of the “barrier”) to effect changes in the tissues.  I want to learn more about this, as I have a few patients who are very pain-sensitive, and I think this might be a gentler approach for them.

Stay tuned tomorrow for the 4th and last installment. 🙂